Creating this video was similar to creating the first video. First, I made the intro. For the Intro I kept my speed/duration at 00:00:00;10. I placed these files into the V1 section and created a zoom effect for all of them. After, I added a title from the Graphics tab on top of the pictures. This title also had a zoom effect. For the main part of the video, I placed the same photos in the V1 section again, but this time I changed the duration to 1min. I added a closer zoom effect and a Gaussian Blur to these images. They acted as a background for the next part of the slideshow. I again used the same photos and placed them in the V2 section. For these images, I added a slide in and fade in effect, using the position and opacity properties. I finally added titles to each of the images and music tracks.
Tuesday, October 30, 2018
Project 2-Premiere Pro
Creating this video was similar to creating the first video. First, I made the intro. For the Intro I kept my speed/duration at 00:00:00;10. I placed these files into the V1 section and created a zoom effect for all of them. After, I added a title from the Graphics tab on top of the pictures. This title also had a zoom effect. For the main part of the video, I placed the same photos in the V1 section again, but this time I changed the duration to 1min. I added a closer zoom effect and a Gaussian Blur to these images. They acted as a background for the next part of the slideshow. I again used the same photos and placed them in the V2 section. For these images, I added a slide in and fade in effect, using the position and opacity properties. I finally added titles to each of the images and music tracks.
Monday, October 29, 2018
Friday Post-October 26/2018
Guide
First off I imported my images into premier pro. Then I highlighted the pictures and dragged them on to V1 in the timeline. Then I selected the first image and went to the effects section. Then I clicked on the stopwatch item that is next to the Scale. This placed a keyframe. Change the scale value to zoom OUT. Move the slider to ‘almost’the end of the timeline click add/remove keyframe’change the scale value to zoom IN.Then move keyframe to the end of the timeline.Select the second image –repeat the process but IN first –OUT last. Move the slider in the Main timeline so the second image shows above it. Then I added my title and scaled and and it rotated it so it would look cooler with the images changing. Now for the main slide show. Highlight the images again and right click: set speed/duration to 00,00,01;00. Then I went to the search menu at the top right and searched for the Gaussian blur. I blurred the first image then copied and pasted the attributes to the rest. Then I dragged all the images again to a new layer. Then I went throught the sequences and adjust the sizes to be small enough to see the blur in behind. Go on to the first image and position the picture so it is off the screen to the right. Now add the audio. Put the audio to the A1 track and use the razor tool to cut off the extra. Now you need to export. Go to Export-Media-H264-set the preset to Youtube 480p SD-choose export. Now post it on your blog and describe how you made it.
Wednesday, October 17, 2018
Video Editing -Slideshow -Basic
'
Guide
First off I imported my images into premier pro. Then I highlighted the pictures and dragged them on to V1 in the timeline. Then I selected the first image and went to the effects section. Then I clicked on the stopwatch item that is next to the Scale. This placed a keyframe. Change the scale value to zoom OUT. Move the slider to ‘almost’the end of the timeline click add/remove keyframe’change the scale value to zoom IN.Then move keyframe to the end of the timeline.Select the second image –repeat the process but IN first –OUT last. Move the slider in the Main timeline so the second image shows above it. Then I added my title and scaled and and it rotated it so it would look cooler with the images changing. Now for the main slide show. Highlight the images again and right click: set speed/duration to 00,00,01;00. Then I went to the search menu at the top right and searched for the Gaussian blur. I blurred the first image then copied and pasted the attributes to the rest. Then I dragged all the images again to a new layer. Then I went throught the sequences and adjust the sizes to be small enough to see the blur in behind. Go on to the first image and position the picture so it is off the screen to the right. Now add the audio. Put the audio to the A1 track and use the razor tool to cut off the extra. Now you need to export. Go to Export-Media-H264-set the preset to Youtube 480p SD-choose export. Now post it on your blog and describe how you made it.
Friday, October 12, 2018
Friday Post:October 12th, 2018

1. Bran Muffin
2. Mirror

3. Fire

The Process
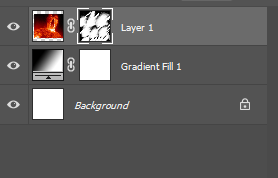
First I got the image and put it into Photoshop. Then I added a gradient to make the grey effect in the background. After that I went back to the image layer and added a mask to and then inverted it using ctrl I. I had to make sure the foreground was white and not black or any other colour. After this I used the brush tool and started to create the picture on the blank background.
Thursday, October 4, 2018
Subscribe to:
Comments (Atom)


